
One of the most common tasks we developers have is sending emails to the user: when registration is complete, when they reply to a thread of interest, or when there’s a notification. This can be a headache because you generally have to conduct several tests, email servers might flag you as SPAM for trying to send the same email multiple times, etc.
Did you know there’s a more professional way to send emails in a local or test environment without needing a real email account? In this article, I’m going to teach you what MailHog is and why you should use it for email testing in your next project.
But before that, let’s review some theory, so you understand how MailHog works and why it can save you a lot of trouble when it comes to testing email sending and how your templates look.
What is an SMTP Server
For many years, there have been two basic protocols that we users use to read and receive email. On one hand, IMAP (or POP3 if you’re a bit old-school) allows you to connect to your mailbox and download your messages. On the other hand, SMTP (which hasn’t changed much over the years) allows you to send an email to other users.
When you finish composing an email and hit send, what’s happening behind the scenes is that you’re making a connection to your email provider’s SMTP server and telling it who you are, what your account and password are, who you want to send the email to, and some other details. If the user/password is correct and there are no errors in the message, the SMTP server accepts the task and will ensure that this email reaches the intended recipient. It’s really the SMTP server that takes care of sending the email, not you.
This is why sometimes, hours after sending an email, it comes back to you with an error indicating that it couldn’t be sent. This is because the SMTP server has been trying for a couple of hours but ultimately couldn’t deliver it.
When we configure an application to send emails, the situation hasn’t changed much: instead of composing them ourselves and pressing the send button, we are delegating this to automated software. This software is responsible for composing the message and sending it to the configured SMTP server.
And this is where possible problems and setbacks for the developer who wants their system to send automatic emails begin.
-
First of all, you need an internet connection to send real emails. This means that if you telework from the forest, you’re going to have coverage issues.
-
On some platforms like Gmail, it’s not enough to just enter a username and password to start sending emails. You need to generate a token and generally activate a series of security mechanisms that can be annoying (and very labor-intensive).
-
You need to use a real account (personal or work). This means that if you send many test emails, your SMTP and/or the recipient’s server might think you’re a bit annoying: temporary SPAM.
-
If the tests don’t go well or you include content that might be suspicious, your account could end up in SPAM for a very long time.
A lot happens when you send an email through your system. Wouldn’t it be nice if there were a testing environment to simplify this process? Exactly, this is where MailHog comes into play. MailHog will simplify the process of sending emails with a fake SMTP server.
What is MailHog and Why It’s Interesting in Development
Now you know how the real sending of an email works, whether from an email client or from an automated system. This is where MailHog comes into play to make your life easier.
MailHog, in short, is a tool that serves to test the deliverability of emails and to “see how the emails look” when you send them. Internally, it creates a fake SMTP server (indistinguishable from a real one at first glance) so that your applications can send the email thinking it is a normal SMTP server. When it detects that an email message is coming in, it captures it and doesn’t send it (as a real SMTP would).
Then, when you upload your application to production, just change the connection parameters with the real SMTP server and there will be no need to touch the application code.
MailHog has a web interface that displays the incoming mail messages as if it were a normal email application. This way, you can see what messages have come in, who the sender and recipient are, and how the email template looks (if it looks good, the HTML works, etc.). The web interface updates in real-time, which means you don’t have to worry about constantly refreshing.
The main advantage that MailHog offers is that we don’t have to deal with network layer problems or the SPAM issues that can be generated by using a real server. However, it has other added advantages, such as being available without an internet connection, so you can go telework in the forest. Plus, it can be installed on almost any operating system and doesn’t take up much space.
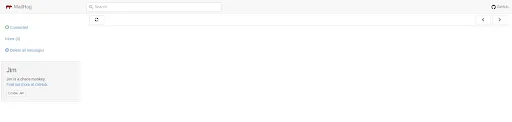
Lastly, to be a good developer, MailHog has an ace up its sleeve: Jim, the Chaos Monkey. Under this comical name is a very useful functionality for the developer: testing how your application behaves when the email server has issues. When you activate Jim the Monkey, randomly, MailHog generates common delivery problems, such as rejected connections or rate limits. This way, you can test if your code supports the failure in sending without having to cut the internet cable.
How to Install MailHog and Get It Running
If I’ve convinced you to use MailHog for sending emails in a test environment, the next step is to see how to install it. You have all the documentation on how to install MailHog on different platforms. For convenience and simplicity, in this article, we are going to use the docker version. Just by launching this command, we will have a MailHog instance up and running on our machine:
docker run --name mailhog -p 1025:1025 -p 8025:8025 mailhog/mailhog
When you use it with another project you have in docker, make sure that your application container and the MailHog container are on the same network, so they can connect properly.
MailHog allows many extra functionalities, such as requiring a username and password, actually sending emails to a real SMTP, or saving the emails it receives in a database to ensure persistence. Review the configuration document through environment variables to learn more.
$ docker run -p 1025:1025 -p 8025:8025 mailhog/mailhog
2022/10/06 10:37:59 Using in-memory storage
2022/10/06 10:37:59 [SMTP] Binding to address: 0.0.0.0:1025
[HTTP] Binding to address: 0.0.0.0:8025
2022/10/06 10:37:59 Serving under http://0.0.0.0:8025/
Creating API v1 with WebPath:
Creating API v2 with WebPath:
Now that we have MailHog up and running, we can configure our application to send emails through this SMTP. You’ll need to configure your application to use “localhost:1025” if you’re local or the container name if you’re in docker: “mailhog:1025”.
Don’t forget to open the user interface through your browser at localhost:8025. You’ll see an incredibly simple window where the emails will appear as MailHog receives them. You can also activate Jim the Monkey to test if your application is fault-tolerant.
Conclusion
Until I discovered MailHog, I also had my Gmail account configured to test the sending of emails and see how the templates looked, but since I discovered it, I always have a MailHog container on my computer 🙂. This way, I work without needing the internet and without having to wait for the message to be sent to other servers: there’s nothing faster than localhost.
I hope you’re now intrigued and from today onwards you’ll send emails in a development environment through MailHog and not a real SMTP. This way, you’ll maintain the credibility of your email account.
Happy coding!